How to Add a Countdown Timer to Your HubSpot Marketing Email with Countdown Builder
Adding a countdown timer to your HubSpot marketing emails is a powerful way to create urgency, boost engagement, and drive conversions. Whether you're promoting a flash sale, event registration, or limited-time offer, a dynamic countdown timer can encourage your audience to take action before time runs out. With Countdown Builder, integrating a visually appealing countdown timer into your HubSpot emails is simple and effective. In this guide, we’ll walk you through the step-by-step process to add a countdown timer to your HubSpot marketing email, optimized for HubSpot for email marketing and HubSpot email tracking.
Why Use a Countdown Timer in HubSpot Emails?
Countdown timers are a proven tactic to enhance your email marketing campaigns. Here’s why they work:
- Create Urgency: A ticking clock motivates subscribers to act quickly, increasing click-through rates (CTR).
- Boost Engagement: Dynamic timers make your emails interactive and visually compelling.
- Drive Conversions: Timers are ideal for time-sensitive campaigns like sales, webinars, or product launches.
- Seamless Integration: With tools like Countdown Builder, you can easily embed timers into HubSpot emails without coding expertise.
By leveraging HubSpot for email marketing, you can combine countdown timers with HubSpot email tracking to monitor open rates, clicks, and conversions, ensuring your campaigns are optimized for success.
Step-by-Step Guide to Adding a Countdown Timer in HubSpot Emails
Follow these simple steps to add a beautiful countdown timer to your HubSpot marketing email using Countdown Builder.
Step 1: Create Your Countdown Timer with Countdown Builder
- Visit Countdown Builder: Go to countdown builder and sign in or create an account.
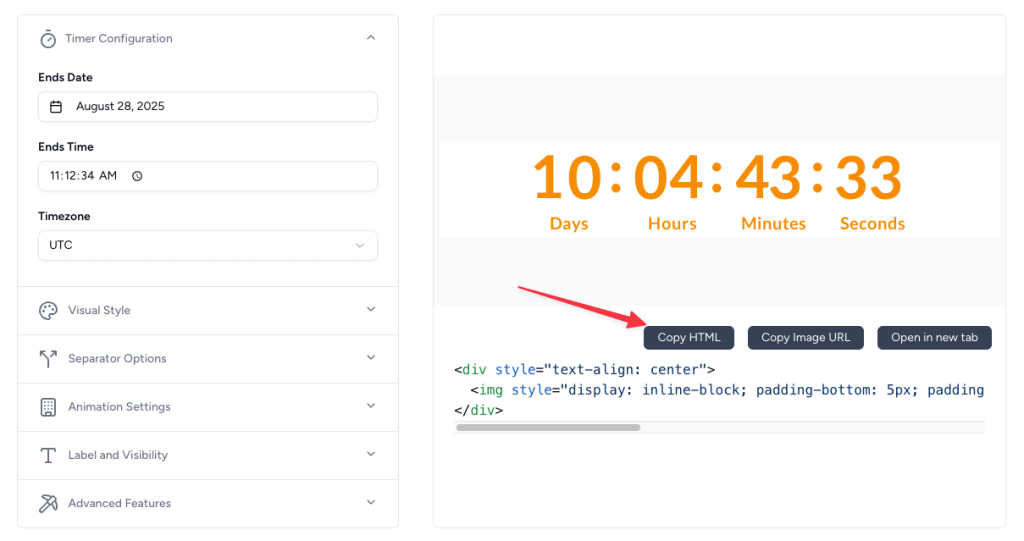
- Create a New Timer: Click to start a new countdown timer and set the end date and time for your campaign (e.g., the end of a sale or event).
- Customize Your Timer: Tailor the timer’s design to match your brand. Adjust the font style, size, background color, and text color to align with your email’s aesthetic.
- Copy the HTML Code: Once your timer is ready, click the “Copy HTML” button to copy the embed code to your clipboard.
Step 2: Add the Countdown Timer to Your HubSpot Email
Open HubSpot Email Builder: Log in to your HubSpot account and navigate to the Marketing section. Select Email and either create a new email or edit an existing template.
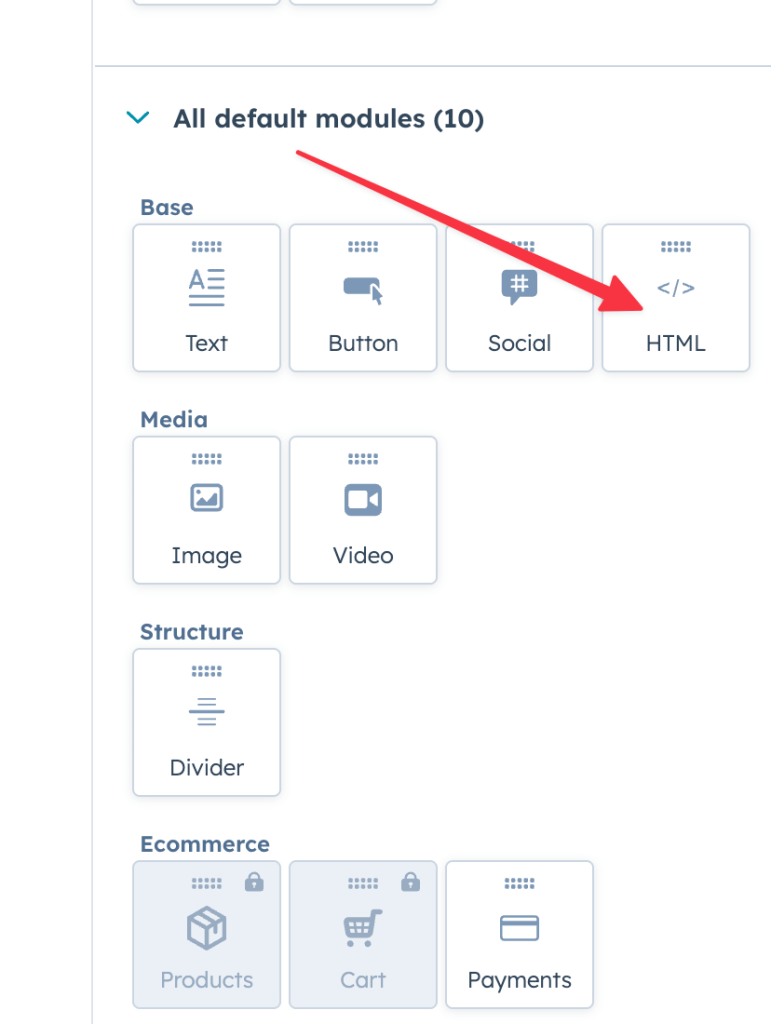
Add an HTML Module: In the HubSpot email editor, go to the “Add” tab on the left sidebar. Click “More” and locate the “HTML – Email” block. Drag and drop this module into your desired location within the email layout.
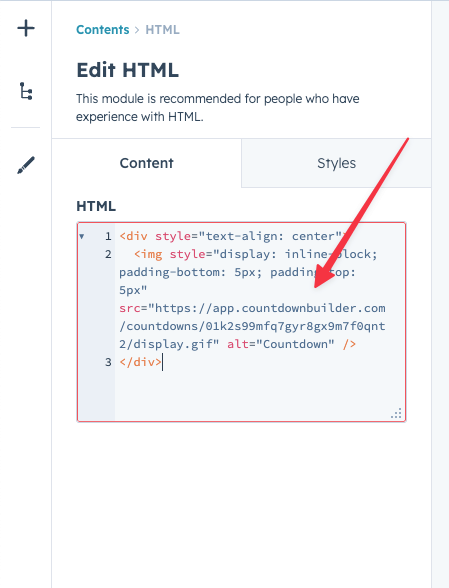
Paste the HTML Code: Click on the HTML module to open the editor. Paste the HTML code you copied from Countdown Builder into the HTML text box.
Save and Preview: Save your changes and use HubSpot’s preview feature to ensure the countdown timer displays correctly. Send a test email to verify it works across desktop and mobile devices.
Congratulations! You’ve just added a stunning countdown timer to your HubSpot marketing email using Countdown Builder.
Best Practices for Using Countdown Timers in HubSpot Emails
To maximize the impact of your countdown timer, follow these best practices:
- Place Near CTAs: Position the timer close to your call-to-action (CTA) button to emphasize urgency. For example, pair it with phrases like “Act Now Before Time Runs Out!”
- Align with Branding: Ensure the timer’s colors and fonts match your brand for a cohesive look.
- Test Across Devices: Use HubSpot’s preview and test email features to confirm the timer displays correctly on all devices and email clients.
- Leverage HubSpot Email Tracking: Monitor your campaign’s performance with HubSpot email tracking to analyze open rates, click-through rates, and conversions driven by the timer.
- Use for High-Impact Campaigns: Countdown timers work best for limited-time offers, flash sales, event registrations, or product launches.
- A/B Test Designs: Experiment with different timer placements, colors, and messaging to optimize engagement.
Why Choose Countdown Builder for HubSpot Emails?
Countdown Builder (https://countdownbuilder.com) is designed to make adding countdown timers to your HubSpot emails effortless. Key features include:
- Easy Customization: Create timers that match your brand without any coding skills.
- Real-Time Updates: Timers refresh dynamically each time the email is opened, ensuring accuracy.
- Mobile-Friendly: Timers are optimized for all devices and email clients.
- Seamless HubSpot Integration: Works perfectly with HubSpot for email marketing, allowing you to focus on crafting compelling campaigns.
Explore More Countdown Timer Integrations
Want to add countdown timers to other email marketing platforms? Check out our guides for:
- Adding a Countdown Timer to Brevo Email Marketing
- How to Add a Countdown Timer in Mailchimp
- How to Add a GetResponse Countdown Timer
Conclusion
Adding a countdown timer to your HubSpot marketing emails is a game-changer for creating urgency and driving action. With Countdown Builder, you can easily create and embed a customized timer in minutes, no coding required. Combine this with HubSpot for email marketing and HubSpot email tracking to craft high-performing campaigns that engage your audience and boost conversions. Try it today and watch your email marketing results soar!