How to Add a Countdown Timer to Klaviyo Email Marketing
 By Mehedi Hasan
Klaviyo's drag-and-drop email editor supports custom HTML blocks, so a countdown timer generated by a timer service can be pasted directly into a campaign or flow email.
This tutorial walks through the process with Countdown Builder, the timer service this blog is published by: design the timer, copy the HTML, add an HTML block in Klaviyo (their email template editor guide covers the editor's blocks), and preview the result.
When to Use a Timer in Klaviyo Campaigns
A countdown timer fits emails tied to a real deadline:
- Flash sales and limited-time offers
- Product launches with a fixed start or end
- Event registration cutoffs
- Abandoned-cart emails where the held cart genuinely expires
Countdown Builder offers three timer types for these cases:
- Standard (fixed-date) — one deadline for every recipient
- Evergreen — the countdown starts when each recipient opens the email
- Dynamic — a per-recipient deadline passed in through a merge tag
How to Add a Countdown Timer in Klaviyo
The flow in Klaviyo:
flowchart LR
    A["Create the timer in Countdown Builder"] --> B["Open a Klaviyo campaign or flow"]
    B --> C["Drag an HTML block above the CTA"]
    C --> D["Paste the timer code"]
    D --> E["Preview and test"]
Step 1: Create the Timer in Countdown Builder
- Visit Countdown Builder: Go to https://app.countdownbuilder.com and sign up for a free account or log in.
- Set the timer details:
- Specify the end date, time, and time zone so the countdown is accurate for your audience.
- Enable evergreen timer functionality (paid plans) to start the timer based on each subscriber's open time.
- Customize the design:
- Choose from 65+ templates or build a custom layout.
- Adjust foreground and background colors, pick fonts from the font library, or add a pulsing separator animation.
- Style the labels (Days, Hours, Minutes, Seconds) for readability and language.
- Configure expiry settings (paid plans). Choose what displays when the timer ends:
- Zero (default) — the timer displays zeros.
- Custom text — a message such as "Offer ended."
- Custom image — an uploaded image, for example a "Sold out" graphic.
- Preview and save:
- Preview the timer, then click Update to save the design.
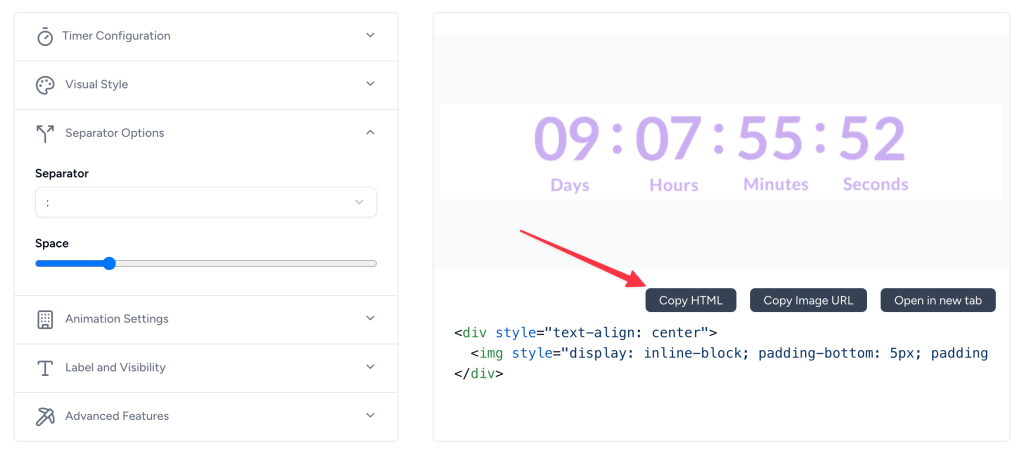
- Copy the HTML code:
- Click Copy HTML to copy the embed code for Klaviyo.
Step 2: Add the Timer to Your Klaviyo Email
- Log in to Klaviyo and open Campaigns or Flows to create or edit an email.
- Open the email editor — Klaviyo's drag-and-drop editor.
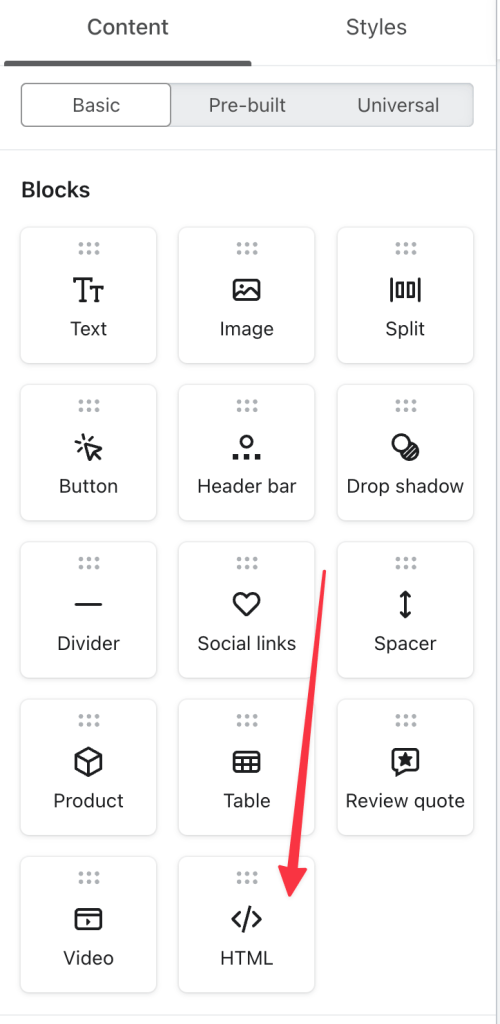
- Add an HTML block:
- Drag an HTML block from the blocks menu to the position in the layout where the timer should appear — commonly the hero section or just above the call-to-action.
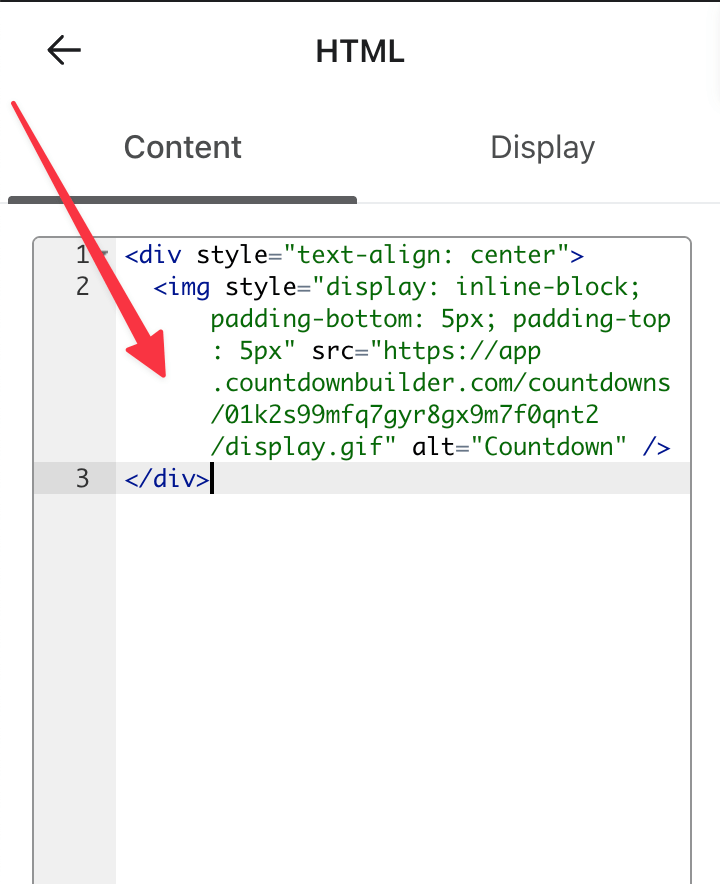
Step 3: Paste the Countdown Timer Code
- Click the HTML block to open the code editor in Klaviyo.
- Paste the HTML you copied from Countdown Builder into the content area.
- Click Done or Apply to embed the timer.
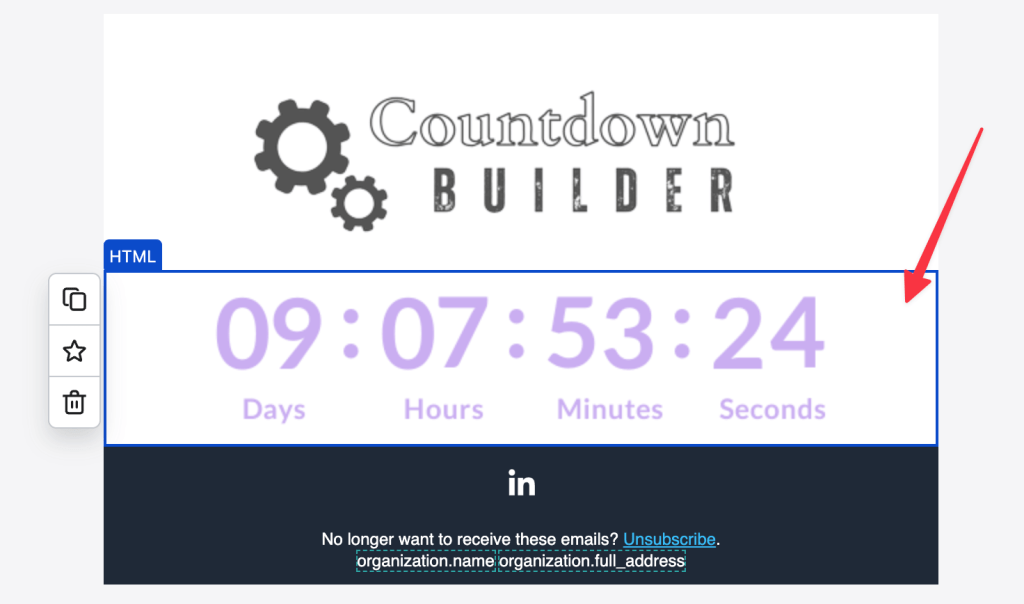
Step 4: Preview and Test Your Countdown Timer
- Preview the email: Use Klaviyo's preview to check that the timer displays correctly and fits the design.
- Send a test email to yourself and colleagues, and open it across devices and clients (Gmail, Outlook, Apple Mail). Countdown Builder's timers are animated GIFs that regenerate each time the email is opened.
- Verify expiry behavior: Confirm the timer shows the correct time remaining and, once it expires, displays your chosen expiry setting.
After You Send
The timer is now part of the campaign. Each open loads a fresh timer image with the current time remaining, and the expiry setting takes over once the deadline passes.
Best Practices for Using Countdown Timers in Klaviyo
- Match your brand: set the timer's colors and fonts to match the email design.
- Keep durations reasonable: 24–72 hours is a common range; match the duration to how long the decision actually takes.
- Check email client support: Gmail and Apple Mail animate the timer, but older Outlook versions (2007, 2010, 2013) show only the first frame of the GIF.
- Pair with clear copy: state the deadline in text as well — "Sale ends Friday at midnight" — so readers with images blocked still get the message.
- Use timers where a deadline exists: flash sales, holiday promotions, event registrations.
Apple Mail Privacy Protection (MPP) adds one more wrinkle: it pre-fetches and caches remote images, which can freeze an animated timer at its cached frame. Countdown Builder serves a static fallback image when the animated GIF can't be refreshed. If a meaningful share of your list reads in Apple Mail, check how the fallback looks before sending.
Timers in Klaviyo Campaigns vs. Flows
Klaviyo's support for custom HTML blocks makes the embedding possible in both one-off campaigns and automated flows:
- Campaigns suit fixed-date deadlines shared by the whole list.
- Flows — welcome series, abandoned cart, win-back — are where evergreen and dynamic timers matter, since each subscriber enters at a different time.
Klaviyo's segmentation and A/B testing can also be used to compare timer and non-timer variants of the same email. Klaviyo's Help Center covers campaign and flow setup in more detail.
Final Thoughts
Adding a countdown timer in Klaviyo comes down to an HTML block and a pasted snippet. The decisions that matter are the timer type — fixed, evergreen, or dynamic — and the design, both of which should follow from how the campaign's deadline actually works.
If you'd like to try it, you can create a free timer. The free plan doesn't require a credit card and doesn't add a watermark.
Last updated: September 2026. The Klaviyo steps above reflect the drag-and-drop email editor as of this date; Klaviyo's interface changes over time, so the exact labels may differ. Countdown Builder features and pricing reflect the product at the time of updating and can change — check the pricing page for current details.
Written by Mehedi Hasan
Writer & Developer. He writes about email marketing, countdown timers, and campaign design.
Connect on LinkedIn