
How to Add an Evergreen Countdown Timer to Email (2026)
 By Mehedi Hasan
An evergreen email countdown timer shows each subscriber a countdown based on when they entered your campaign or opened your email, rather than a single deadline shared by everyone.
This guide explains how evergreen timers work, when they're the right choice, and how to create one step by step with Countdown Builder, the timer service that publishes this blog.
What Is an Evergreen Countdown Timer?
Most email countdown timers fall into one of two categories:
- Fixed-date timers: every subscriber sees a countdown to the same public deadline. "Sale ends Friday at midnight."
- Evergreen timers: the countdown starts when an individual subscriber opens the email or enters a campaign, so each subscriber has their own deadline. "Your 48-hour offer begins when you enter the campaign."
Because each subscriber's deadline is calculated individually, evergreen timers live mostly in automated sequences: welcome series, abandoned cart flows, course launch funnels. People join those at different times, so a shared deadline doesn't describe their situation.
If you're comparing tools that support both, our comparison of 9 timer tools covers which ones handle evergreen timers and how they charge for them.
When to Use an Evergreen Timer
An evergreen timer is the right choice when:
- The offer window is personal, not public. For example, a discount that expires 48 hours after someone joins your list, or cart items held for 24 hours after abandonment.
- The campaign runs continuously. Automated sequences that run year-round shouldn't need their deadlines rewritten every time someone new enters the funnel.
- Each subscriber's deadline genuinely differs. Evergreen timers calculate time remaining per recipient instead of showing everyone the same countdown.
- Subject lines reference a personal deadline. "Your 48-hour offer has started" only makes sense when the deadline is actually tied to the individual.
An evergreen timer is the wrong choice when there is one real, public deadline: a Black Friday sale, a live webinar, a launch date. In those cases a fixed-date timer is the honest option, because it shows the deadline everyone actually has.
How to Create an Evergreen Email Countdown Timer
The following steps walk through creating an evergreen timer in Countdown Builder.
Step 1: Open the Timer Builder
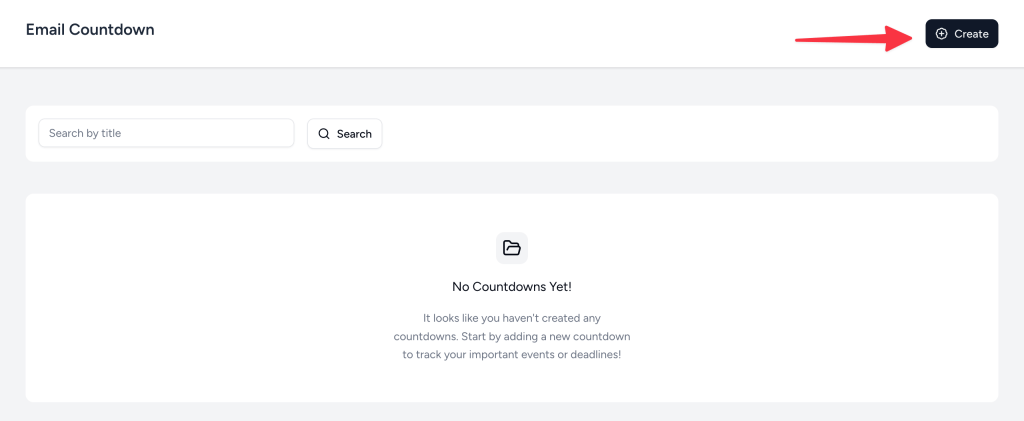
Visit Countdown Builder and click the Create button to start a new countdown timer.
Step 2: Select "Evergreen"
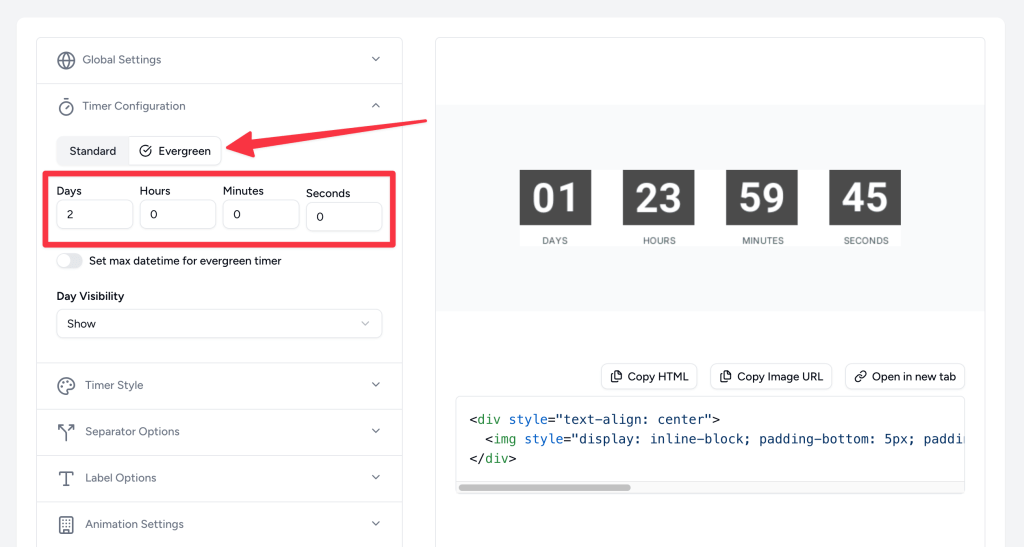
On the timer type selection screen, choose the Evergreen option. This configures the countdown to start individually for each email recipient, based on their entry into your campaign or when they first open the email.
Step 3: Configure the Timer Duration
Set how long each subscriber should have to act on your offer, in days, hours, minutes, and seconds. For example, "48 hours from email open" or "72 hours from list subscription."
Common durations by campaign type:
| Campaign Type | Typical Duration |
|---|---|
| Flash sales | 24–48 hours |
| Mid-range product offers | 48–72 hours |
| High-ticket items | 5–7 days |
| Course launches | 3–5 days |
| Webinar registrations | 2–4 days |
| Trial periods | 7–14 days |
When choosing a duration, consider your sales cycle and how much time subscribers realistically need to decide. A duration that feels arbitrarily short tends to produce dead links and expired offers rather than faster decisions.
Step 4: Customize the Timer Design
Design the timer to match your brand and email template:
- Style: circular, rectangular, flip clock, or minimal layouts
- Colors: background, numbers, labels, and border
- Fonts: typography that matches your email design
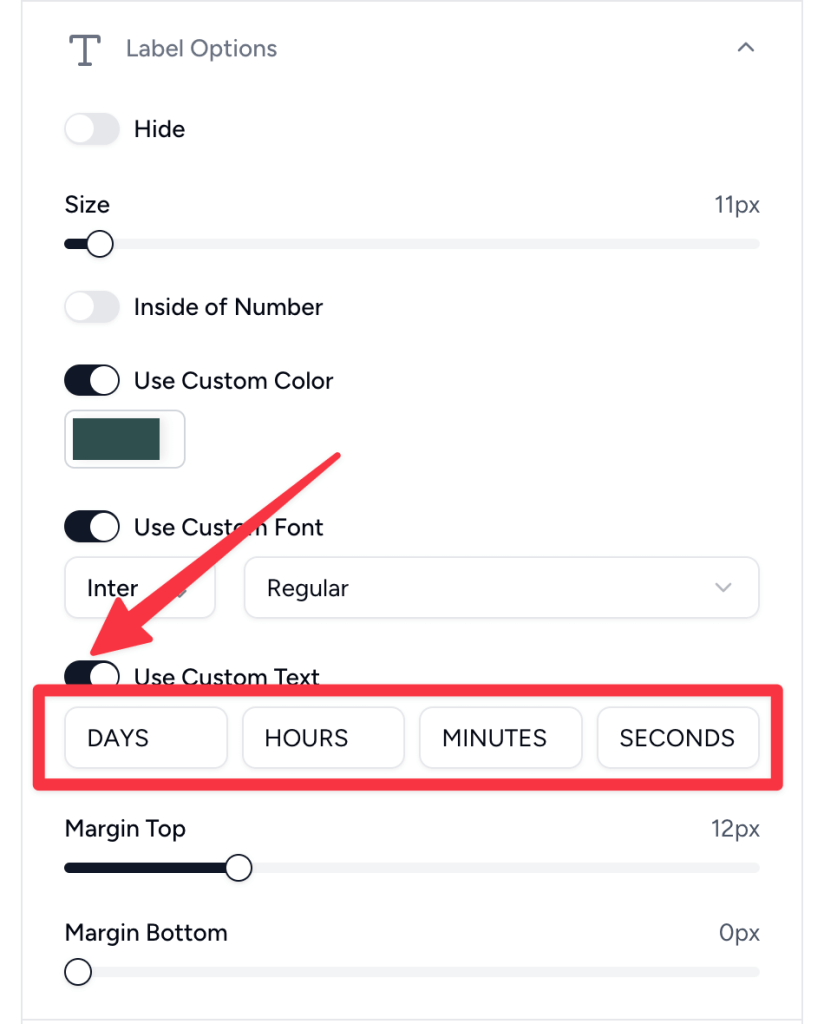
- Labels: customize "Days," "Hours," "Minutes," "Seconds," including other languages
Step 5: Copy the Timer Code
After finishing the design, click the Update button at the top to save your changes. Then click Copy HTML to copy the HTML snippet for your email.

Paste the HTML into your email template in your ESP. Most major ESPs (Mailchimp, Klaviyo, HubSpot, ActiveCampaign, and others) accept the snippet as-is. Our ESP-specific tutorials cover Mailchimp, Klaviyo, and HubSpot in detail.
Best Practices for Evergreen Email Countdown Timers
1. Match the Duration to the Offer
The durations in the table above are starting points. The test of a good duration is simple: the offer should genuinely expire when the timer reaches zero, and the time given should match how long the decision actually takes.
2. Place the Timer Where the Decision Happens
Common placements: above the fold in the hero section, immediately before the CTA button, or as a P.S. reminder at the end. If you use it more than once, header and footer placements reinforce without cluttering.
3. Write Subject Lines That Match the Mechanic
If each subscriber has a personal deadline, subject lines can reference it directly: "Your 48-hour offer starts now, Name." Avoid subject lines that imply a shared public deadline ("last day for everyone") when the campaign is evergreen; the mismatch is noticeable if a subscriber re-opens the email later.
4. Structure the Sequence Around the Countdown
A typical evergreen sequence:
- Start: "Your exclusive offer has started" (introduce the timer)
- Midpoint: "Half your time is gone" (reminder)
- Final hours: "Last chance, your timer expires soon" (final urgency)
- After expiry: "You missed it" (optional re-engagement)
Each email in the sequence should show the same timer embed, so the subscriber's deadline stays consistent from message to message.
5. Keep Deadlines Honest
This matters more than any design choice:
- Don't restart timers for the same subscriber to manufacture extra urgency
- Actually remove or expire the offer when the timer ends
- Use evergreen timers for offers that genuinely have a per-subscriber window
Fake urgency can produce a short-term bump in clicks, but subscribers notice reset timers and expired offers that still work. Over time that distrust hurts open rates and deliverability more than any timer helps conversions.
6. A/B Test One Variable at a Time
Timer duration (24h vs 48h), design style, placement, and timer-versus-no-timer are all worth testing. Change one thing per test or you won't know what moved the result.
Example: Verification-Code Emails
A resend code timer is the small countdown you see on verification and two-factor authentication emails: "This code expires in 10:00" or "You can resend the code in 0:59." It tells recipients how long their one-time passcode stays valid and how long they must wait before requesting a new one.
Because every code is issued at a different moment, each recipient needs a personal deadline, which is exactly what timer images do well:
- Code expiry: set the timer to end when the passcode expires, for example 10 minutes after send. A dynamic timer with an
endsAttimestamp per recipient, passed via your ESP's merge tag, counts down to each person's exact expiry moment. - Resend cooldown: for "resend code in 0:59" notices, an evergreen timer that starts when the email is opened gives every recipient the same short countdown.
Pair the timer with plain-text backup copy ("Your code expires 10 minutes after this email was sent") so the urgency still lands for readers who have images blocked. The same pattern works for magic links, expiring invoices, and one-time discount codes.
How Email Timers Work Behind the Scenes
Email clients don't run JavaScript, so countdown timers are delivered as dynamically generated images, typically animated GIFs. When someone opens your email:
- The email client requests the timer image from the timer service's server
- The server generates a countdown based on that recipient's deadline
- The image displays the current time remaining, and is regenerated with accurate time on each subsequent open
Two behaviors affect this. First, some subscribers have images blocked by default, so write alt text that carries the message ("Offer ends 48 hours after this email was sent") and keep the deadline in body copy, not only in the image. Second, Apple Mail Privacy Protection (MPP) pre-fetches and caches remote images, which can freeze an animated timer at the moment it was cached. If a meaningful share of your audience uses Apple Mail, check whether your timer service provides a static fallback. Countdown Builder renders a styled static image showing the offer's title and end date when the animated GIF can't be refreshed. MPP also has a cost side effect worth knowing: every pre-fetched image load counts as a view on per-view-priced services, which is one reason we price flat-rate instead.
Measuring Whether the Timer Helps
The core comparison is timer emails against equivalent emails without one, on click-through rate, conversion rate, and revenue per email. Watch unsubscribe rate across the sequence for urgency fatigue, and check time-to-conversion to learn when in the countdown people actually buy. Your ESP's native analytics plus UTM parameters in Google Analytics cover the attribution; A/B testing handles the rest.
Countdown Builder includes a real-time analytics dashboard with per-timer impressions on paid plans. Current plan details are on the pricing page.
Final Thoughts
Evergreen countdown timers are a good fit for automated campaigns where each subscriber genuinely has their own offer window: welcome offers, abandoned carts, evergreen course funnels, verification codes. For campaigns with one public deadline, a fixed-date timer is the better and more honest choice.
Two things determine whether an evergreen timer helps or hurts your results: the deadline must be real, and the duration must match how long the decision actually takes.
If you'd like to try one, you can create a free evergreen timer at Countdown Builder. The free plan doesn't require a credit card and doesn't add a watermark to the timer.
Last updated: September 2026. Product features and pricing described in this article reflect Countdown Builder at the time of updating and can change. Verify current details on the pricing page before purchasing.
Written by Mehedi Hasan
Writer & Developer. He writes about email marketing, countdown timers, and campaign design.
Connect on LinkedIn