
WordPress Countdown Timer: Add One Without a Plugin (2026 Guide)
 By Mehedi Hasan
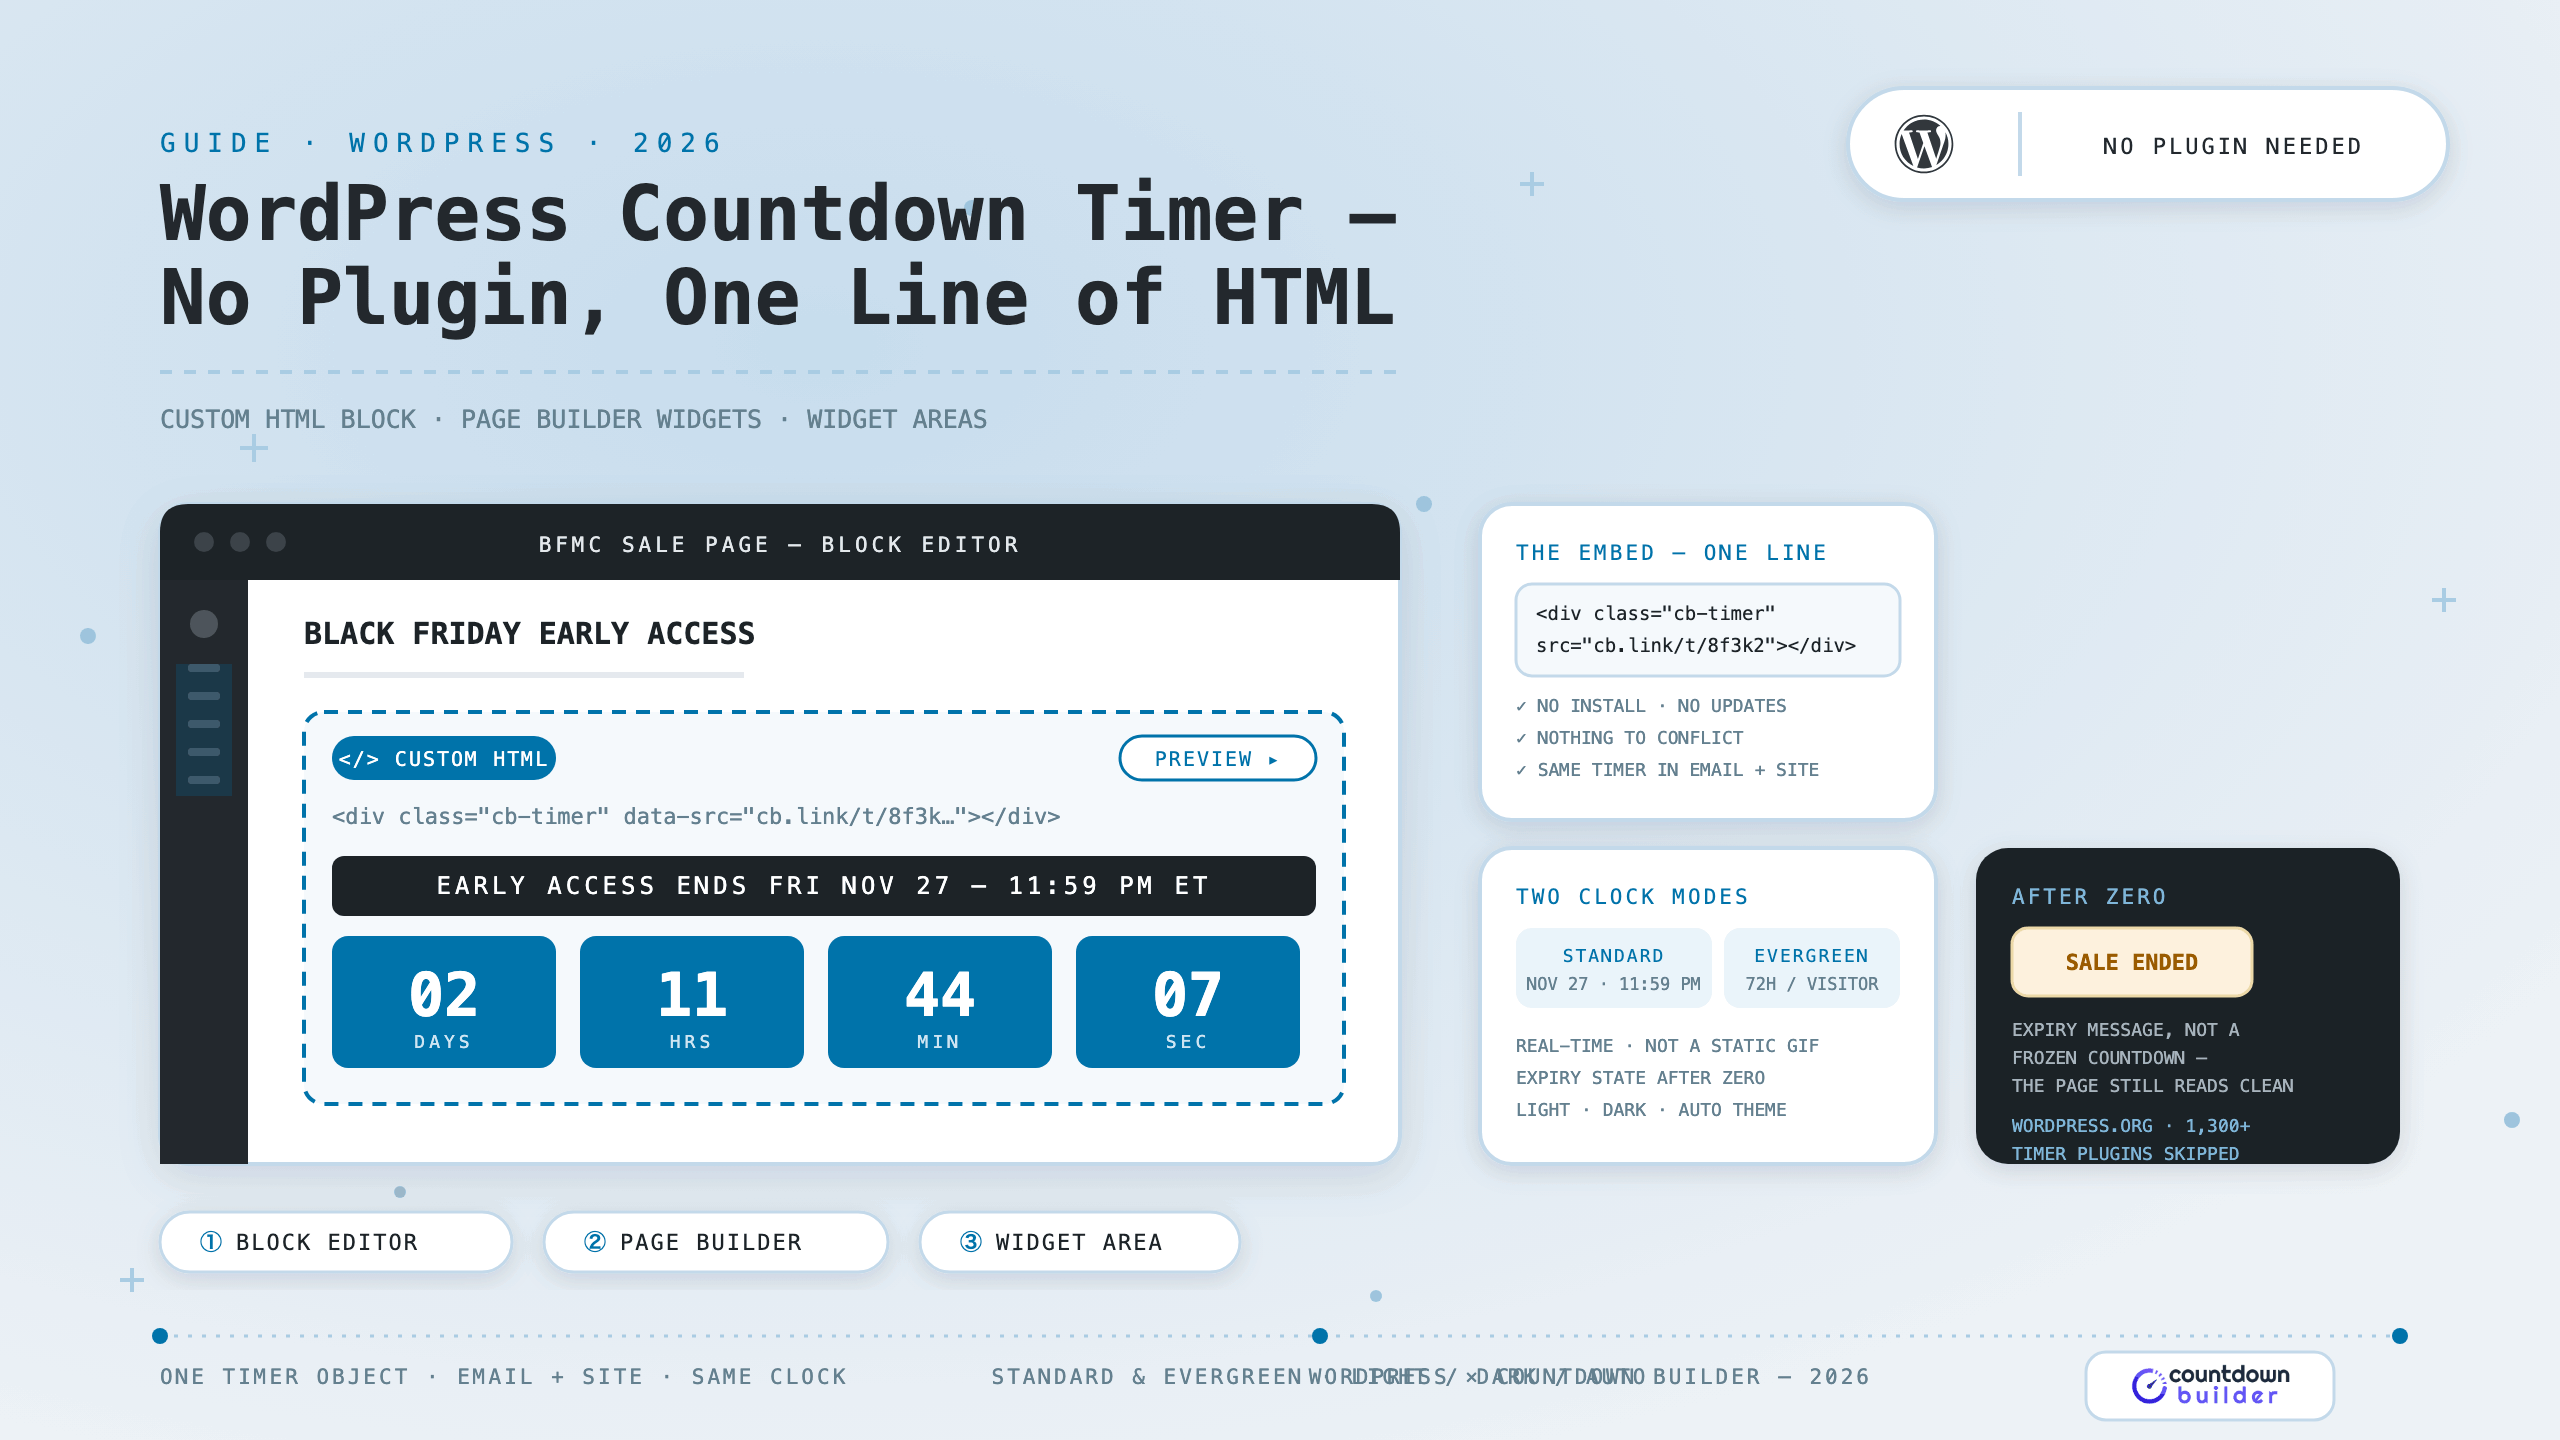
A countdown timer on a WordPress site usually means one thing: a trip to the plugin directory. Search "countdown" there and you get over 1,300 plugins — dedicated timers, coming-soon pages, WooCommerce sale banners, block-based widgets. For a site owner prepping a Black Friday page or a launch, installing one more plugin is the familiar path.
There is a second route that most of those searches skip: a hosted embed. You design the timer in a builder, copy one line of HTML, and paste it into the page — the Custom HTML block in the block editor, an HTML widget in a page builder, or a widget area. No plugin to install, nothing to update, no new entry in the plugins screen. Countdown Builder makes website timers this way, and this guide walks through exactly where that embed goes in WordPress, step by step.
First, the honest comparison — because the plugin route is not wrong.
Plugin or Embed: What Each Route Actually Gives You
The plugin route. A countdown plugin runs inside your WordPress install. The timer is self-hosted (no external requests to render it), it can ship a native block that appears in the inserter like any core block, and some add WordPress-specific features — WooCommerce sale scheduling, shortcode placement, recurring countdowns. The tradeoffs are the usual plugin tradeoffs: another thing to install and update, another item in your stack that can conflict with a theme or another plugin during a major WordPress upgrade, and a timer design interface that was built for WordPress rather than for timer design.
The embed route. The timer lives on a host and loads as a single line of HTML. Nothing is installed, so there is nothing to update and nothing to conflict — the embed is just markup on the page, the same as any image or link. The timer renders in real time, and because it is hosted, the exact same timer can appear in your email campaign and on your WordPress page, counting to the same deadline. Design work happens in a builder made for timers — colors, fonts, segment styling, separators, expiry states — with a live preview, rather than through WordPress settings screens. The tradeoff is the mirror image: the timer depends on an external host being up, and you are trusting a third party (in this case, us) to serve it.
Neither route is universally right. If your policy is "nothing external, ever," use a plugin. If the deadline matters more than the plumbing — a seasonal sale, a launch, an event — the embed gets a good-looking timer onto the page in about two minutes with zero new plugins.
The rest of this guide is the embed route, surface by surface.
Where the Embed Goes in WordPress
WordPress gives you more than one place to paste HTML, and the right one depends on where the timer should live.
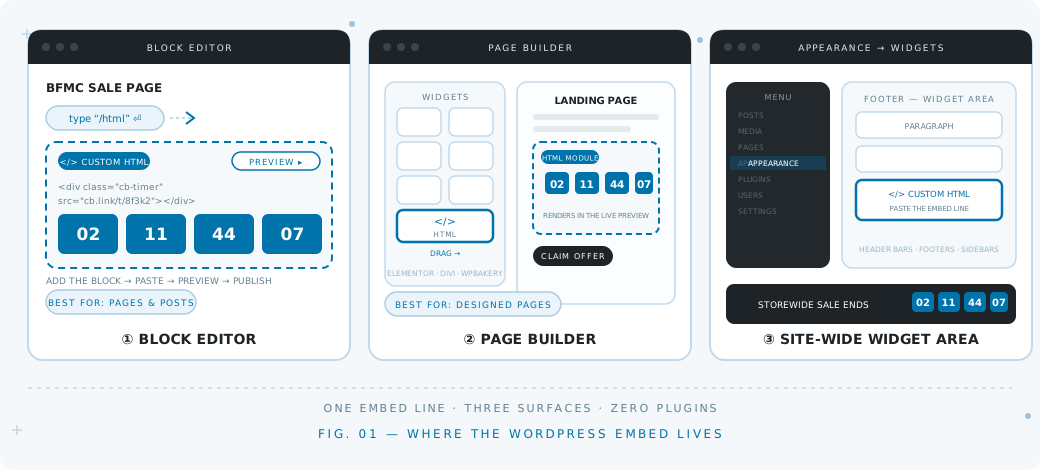
The same one-line embed, three surfaces: the block editor, a page builder, and the widget areas that power headers and footers.
The Block Editor: Custom HTML Block
For a page or post built in the standard editor, the Custom HTML block is the natural home. WordPress's own documentation covers the block in detail — add it through the Block Inserter, or type /html in an empty paragraph and press enter.
- Edit the page where the timer belongs.
- Add a Custom HTML block at the spot —
/htmlis the fastest route. - Paste the embed line into the block.
- Use the block's Preview to see the timer render before you publish.
One caveat worth knowing, straight from the WordPress docs: accounts with limited roles (a Contributor, for example) have some markup stripped when they save HTML for security reasons. If you paste the embed and it comes out mangled, the account you are using likely lacks HTML permissions — an Administrator or Editor will not hit this on a standard install.
The Classic Editor: Text Tab
Sites that kept the classic editor (via the Classic Editor plugin or an older workflow) have a simpler paste: open the post or page, switch from Visual to Text, and paste the embed line where the timer belongs. The markup survives the save exactly as pasted.
Page Builders: HTML Widgets
If your pages are built with a page builder, each one has an HTML module, and the embed drops straight into it:
- Elementor — the HTML widget. Drag it in, paste the embed, and the timer renders in the builder's live preview.
- Divi — the Code module, which accepts HTML in the same way.
- WPBakery — the Raw HTML element.
The same applies to landing-page plugins with HTML modules. If the builder accepts markup, the embed works.
Widget Areas: Headers, Footers, Sidebars
A site-wide countdown — a sale bar above the header, a footer reminder — belongs in a widget area. In the WordPress dashboard, go to Appearance → Widgets, add a Custom HTML widget to the header or footer region your theme exposes, and paste the embed. Recent WordPress versions treat widget areas as blocks, so the Custom HTML block is available there too, exactly as in the page editor.
Theme Templates: With Care
Placing the embed directly in a theme file (header.php, for example) works, but theme edits are lost on theme updates unless you use a child theme. On block themes, the Site Editor lets you insert a Custom HTML block into the header template part without touching files — that is the safer route for a site-wide timer.
Building the Timer
The timer is created in Countdown Builder — the same account covers email timers and website timers.
- Create the timer. Open the dashboard, choose Website Countdown → Create, pick a template, and name it after the campaign ("BFCM sale page") so it is recognizable later.
- Choose the timer type. Standard counts to a fixed date and time with full timezone support. Evergreen starts a per-visitor window — each new visitor's countdown begins when they first arrive.
- Set the deadline precisely. If the sale ends Friday, Nov 27 at 11:59 PM ET, set exactly that. A page timer an hour off argues with your email timer, and visitors notice.
- Design it to match the site. Light, Dark, or Auto appearance — Auto follows the visitor's system preference, which suits WordPress themes that ship both modes. Colors, fonts, segment styles, separators, and labels are all adjustable in a live preview.
- Configure the expiry state. Decide what the page shows after zero — the timer can display a custom message ("Sale ended") instead of a frozen countdown. On a page that outlives its deadline, this is what keeps the page from looking broken to late visitors.
- Copy the embed code. One line. Paste it into whichever surface above the page uses, preview, and publish.
Standard or Evergreen — Which Fits the Page?
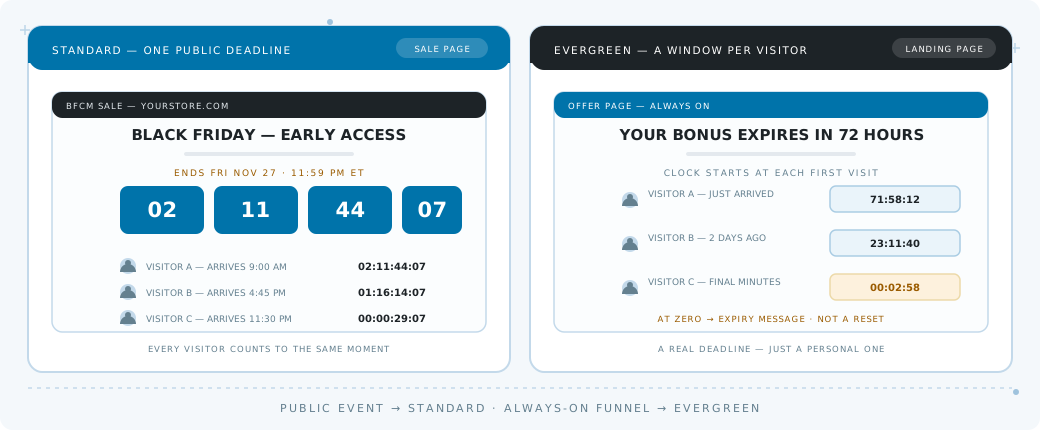
Left: the sale-page case — one public deadline, and each visitor sees the time left to that same moment. Right: the evergreen case — each visitor's window starts at their first visit.
Standard is the right choice when the deadline is public. A Black Friday page, a webinar registration cutoff, a course enrollment close — everyone can see the same clock because the deadline belongs to the event, not the visitor.
Evergreen fits always-on funnels. A landing page offering "three days to claim your bonus" to every new visitor, year-round, needs a timer that starts per person. A fixed date is the wrong instrument there: two months in, the page would either show a lapsed deadline or need constant re-dating. The evergreen timer gives each visitor a real window from their first visit, which is a genuine deadline — just a personal one.
The honest rule is the same one that governs email timers: the deadline must be real. An evergreen window that resets on every reload is a fake countdown, and repeat visitors catch on quickly.
Where a WordPress Timer Earns Its Keep
- Seasonal sale pages. The BFCM landing page with a visible end time — the deadline the whole promotion hangs on. (The BFCM email playbook covers pairing the page timer with the send sequence.)
- Coming-soon and launch pages. A launch date the waitlist can watch approach — the coming-soon and waitlist countdown guide is the dedicated walkthrough, including the launch-day expiry state.
- Webinar and event pages. Registration closes at a fixed moment; the timer says which moment. The webinar countdown guide covers the email side.
- Course enrollment closes. Cart-open to cart-close windows, where the page and the email sequence share one deadline — see the course launch guide.
- WooCommerce sale banners. A sitewide widget-area timer for a storewide discount; the cart-recovery email side is covered in the WooCommerce abandoned cart guide.
One Clock: the Page and the Email Agree
The quiet advantage of a hosted timer is consistency. The WordPress page embeds one timer object; the launch email embeds the same one; both count to the same instant, because they are the same timer. When the email says "ends Friday" and the page timer says Friday, the deadline feels solid — when they disagree, even by a timezone, the promotion starts to feel sloppy.
The general mechanics of website timers — types, customization, embedding on any platform — are covered in the website countdown timer guide; this post is the WordPress-specific walkthrough of the same embed.
Final Thoughts
A countdown timer on WordPress does not require a plugin any more than a YouTube video does — the platform accepts markup, and markup is all a hosted timer needs. Paste the line into a Custom HTML block, an Elementor HTML widget, or a footer widget, and the timer is live: fixed for public deadlines, evergreen for personal windows, with an expiry state so the page still reads after zero.
For the next deadline on the calendar, you can create a free countdown timer on the free plan — no plugin, no credit card, no watermark — and have it on the page before the copy is final.
Related Guides
- How to Add a Countdown Timer to Your Website
- Black Friday Email Countdown Timer: The 2026 BFCM Playbook
- Webinar Countdown Timer Emails
- Course Launch Emails with a Countdown Timer
- WooCommerce Abandoned Cart Emails with a Countdown Timer
Last updated: October 2026. WordPress surfaces described above reflect the block editor and widget areas at the time of updating; plugin and page-builder interfaces change, so menu names may drift. Countdown Builder features and pricing can change; see the pricing page for current details.
Written by Mehedi Hasan
Writer & Developer. He writes about email marketing, countdown timers, and campaign design.
Connect on LinkedIn